petaLibrary Guide: How to access and use your space
Version 13 September 2018 by Libby Megna
Where to get help
If this document isn’t solving your problems:
- Ask Libby for help (lmegna@uwyo.edu).
- Contact one of the ARCC staff (arcc-help@uwyo.edu); they will answer questions via email and they have office hours in Aven Nelson, see https://arcc.uwyo.edu/content/arcc-staff. Mike Killean (mkillean@uwyo.edu) seems to be particularly involved in petaLibrary.
Basic info
ARCC's page on petaLibrary is here: https://arcc.uwyo.edu/guides/petalibrary
Unless you are faculty or staff, you have to purchase space on petaLibrary if you want to use it. Faculty and staff have 500 Gb free but they have to put in a request to actually get access.
Rules: Don’t store anything in petaLibrary that would violate DMCA copyright or HIPAA.
Whoever sets up your space will give a user or two that can manage permissions. Usually this would be the PI, but I manage the petaLibrary on behalf of my advisor because I can use a Windows machine. These users can add or remove other users from the permissions. The easiest way to set up permissions is where everyone can see everything in all subdirectories, and can also edit or delete things. This is kind of scary, but I found setting the permissions differently to be aggravating.
The ARCC folks also have this kind of access (which is good, in case we need help). More on setting permissions later in this document.
petaLibrary consists of multiple spaces; lab allocations will be in Commons. The free allocations for faculty or staff are in Homes.
Each file within Commons is backed up across three redundant systems. This is way better than storing stuff on your personal computer’s hard drive or on an external drive—this is like storing data in Dropbox or Google Drive.
Sixteen versions of each file in Commons will be saved—the last 16 versions you make of a file, with max of one version change per day. So, if you are changing a file at least once a day, the versions available to restore of that file will only go back as far as 16 days ago. If you only edit a file once a month, you will still have the last 16 versions but that will span 16 months. Basically, the upshot is that if you want a lot of version control you’ll have to do it manually. But if something goes terribly wrong and you want to restore a previous version within the 16-version limit, it’s possible. If you need to restore a previous version of a file, or a deleted file, you have to contact the ARCC folks. They are working on having an end-user system for doing that, but it’s not available yet.
If you don’t make changes to a file for an extended length of time (3 months? not sure) your file will be “archived” in a hidden, back-end side of Commons. This doesn’t affect you much in practice, it may just take a tiny bit longer to access those files once you do interact with them again. They don't disappear from your folder or anything, they just aren’t actually stored in the Commons front-end.
Accessing petaLibrary off-campus
The rest of this guide assume that you are trying to access petaLibrary from within the UW firewall (either on UWYO wifi or wired connection). If you want to access petaLibrary from off campus, you have to set up a VPN client to connect to WyoSecure. Once that’s set up, you connect to WyoSecure and then connect to petaLibrary as you usually would. Instructions here: https://uwyo.teamdynamix.com/TDClient/KB/ArticleDet?ID=15874
Accessing petaLibrary from a Windows machine
I wrote these examples for a Win 7 machine, and screenshots are of Win 7. If you’re running a different version and you need help, let me know, but the basics should be the same.
1. Click Start, then click Computer to open Windows Explorer
2. Click “Map Network Drive” near the top of the window
3. Choose a drive letter—I don’t think it matters which one, although your student drive is H by default so I would avoid that. I picked Z.
4. In the folder line, add \\petalibrary.arcc.uwyo.edu\Commons\CarlingLab\ where you replace "CarlingLab" with the name of your allocation.
5. Your dialog window should now look similar to this (except you will just have “Z:” in the Drive dropdown menu—mine’s different as I had previously connected to petaLibrary).
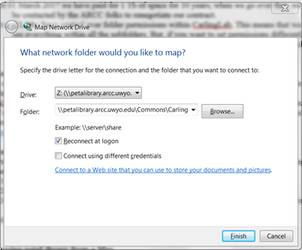
6. Click Finish
7. A login box will pop up. For the username field, enter UWYO\username, where “username” is your UWYO username. I’d enter UWYO\lmegna. If you don’t add the UWYO\ prefix your login will not work.
8. Enter your UWYO password in the password field.
9. Only check the box to remember your credentials if you are on your personal computer or want to save your login.
10. Click Ok [or whatever it says…forgot to check]
11. You should now be connected to your folder! Should look something like this:
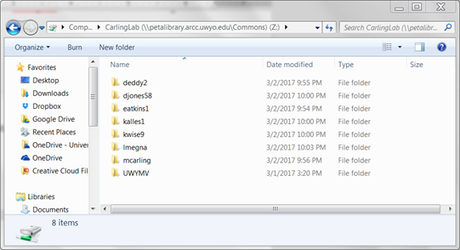
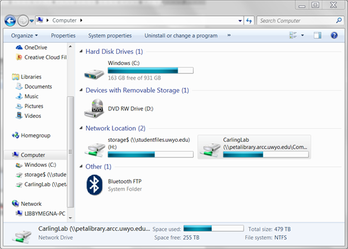
Now, when you want to get back to your allocation, just open Windows Explorer and navigate to Computer. The link should be there as a network location (something like the image below). You will have to enter your username and password to get back in during a different session, unless you saved your credentials.
Note that instead of mapping the drive, you could just copy the address your allocation (e.g. \\petalibrary.arcc.uwyo.edu\Commons\CarlingLab\) into the address bar of Windows Explorer, and then log in as explained above. I personally find this solution less handy than having a shortcut to the network location, but you do you.
Another note is that some of my undergrads were unsuccessful in accessing petaLibrary in this way from newer Windows OS. I spent a couple of hours with IT trying to figure this out, but we never succeeded. I think it's some sort of firewall/permissions issue but I'm a noob on that front, plus didn't have a laptop with Win 10 to troubleshoot it for myself. Compounded by the fact that newer laptops don't have ethernet ports so we couldn't troubleshoot if it was a problem limited to the UWYO wifi network. IT never figured it out for me and I gave up. This is a big drawback, because I wanted everyone to be able to work on research from any machine they wanted.
Accessing petaLibrary from a Mac
Connecting to petaLibrary requires SMB 2, which in turn requires Mac OS 10.9 or later. Note that because you’re connecting to a Windows share, folders with lots of files may take a long time to populate. (ARCC told me they were trying to find a solution to this, but that was 1-2 years ago at this point...)
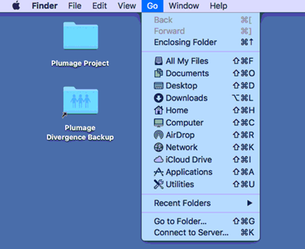
1. Open a Finder window
2. Click the Go dropdown menu at the top left of the screen
3. Click Connect to Server… at the bottom of the menu
4. For the server address, use smb://petalibrary.arcc.uwyo.edu/Commons/CarlingLab/ but replace "CarlingLab" with the name of your allocation.
5. Hit the plus button if you’d like to save the address to the list of favorites
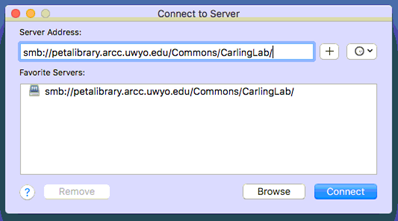
6. Hit Connect
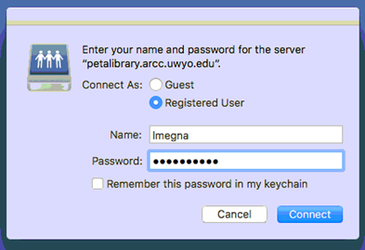
7. Log in with your UWYO username and password. Note that the dialog box will autofill the Name field with the username of the account you’re logged into. For my account on our Lab Mac, that’s libbymegna, so I have to change it to my UWYO username lmegna. Do not save the password in your keychain unless you want it to be easy for anyone who uses the computer to log in as you.
How to set permissions for subfolders
Currently, this can only be done from a Windows machine.
- Right-click on the folder for which you want to set permissions.
- Click Properties
- Click the Security tab
- Click Edit…
- From here, you can remove an existing user (highlight them, then click Remove) or add users (Add…)
- To add users, type their UWYO username into the box that says “Enter object names to select”. Once you have entered a username, hit Check Names and it will fill in their email address. Add as many users as you want.
- Inheriting: Inheriting of permissions is turned on by default. So, if you add a user to a folder, they will have the same permissions for all subfolders. Right now, I have set it up so that everybody has access to CarlingLab and all subfolders within it, because this is easiest. Please do not alter other people’s files!
- Note that when you change permissions, it has to apply the changes to every file in the allocation. With all the files in our space, that means when I add new lab members it takes about an hour to change permissions on all the files.
Transferring files to and from petaLibrary
You can copy or move files to and from your allocation just like any other folder on your computer. If you want to move a large amount of stuff to or from petaLibrary, you can use Globus: https://www.globus.org/ You log in directly with your UWYO username and password, then use the file transfer utility. I used this all the time to move files between petaLibrary and Bighorn.
Using petaLibrary with R
For these examples I will show how I would set my working directory to lmegna, assuming I have connected to petaLibrary as shown above.
To set your working directory in R within Windows:
setwd(“Z:/lmegna”)
You must use the letter of the drive to which you mapped CarlingLab. Note that because I mapped the Z: drive to /Commons/CarlingLab, the “next” folder options in the directory are lmegna, mcarling, etc. Using setwd(“Z:/CarlingLab/lmegna”) will not work, because “Z:” already means “petalibrary.arcc.uwyo.edu/Commons/CarlingLab”. Of course, you could map the drive differently and then you would have to modify your path to the working directory accordingly.
To set your working directory in R within Mac OS:
setwd(“/Volumes/CarlingLab/lmegna”)
Note that the pathing is slightly different. If you connected using the smb example given above, the map is to CarlingLab. “/Volumes/lmegna” will not work, and neither will “/Volumes/Commons/CarlingLab”. Obviously, if you smb to a different location you will have to adjust your setwd() syntax accordingly. You can double-check what directory you have mapped by opening Terminal and running ls /Volumes.
Bonus tip! If you switch between operating systems all the time like I do and don't want to waste your life changing your paths in R, this will do it automatically:
# Set working directory--automatically picks correct path based on OS I'm using
# Code from https://mkevane.com/2014/04/20/setting-working-directory-in-r/
mainDir1 <- "Z:/lmegna"
mainDir2 <- "/Volumes/Commons/CarlingLab/lmegna"
subDir <- "NicheDiv"

# Pick working directory based on which path exists
if (file.exists(mainDir1)){
setwd(file.path(mainDir1, subDir))
} else {
if (file.exists(mainDir2)){
setwd(file.path(mainDir2, subDir))
}
}
Related articles